Accurate Ways To Illustrate Embossings
by Mark Lauckner
Reprinted from "Crown Jewels of the Wire", May 1994, page 19
During the last couple of years I have tried numerous ways of illustrating
insulator embossings. At first I thought I could just photograph the skirts with
the embossings. Then I quickly realized that the insulators were round, and
photographs were flat. At close range the focus did not work and I couldn't read
the sides.
I tried rotating video scans, graphite and grease-pencil rubbings. I
tried rotating the skirt of the insulator on a photocopier in unison with the
band of light as it crossed the glass. I tried rolling the skirts in chunks of
colored plasticine and photocopying them. I was close to giving up completely.
Then I discovered aluminum foil, white paint and white plasticine.
Following are
the 2 methods I found to the best.
Method #1
Line drawing on foil impressions.
For this method you will need to start with a strip of aluminum foil about a
foot long, free from wrinkles. Next, apply flat white spray paint to the foil.
Thin misty spraying sticks better than close range flooding. I use the dull side
of the foil as it sticks better than the polished side. Lacquer-based sprays
will dry in minutes but oil-based ones need to be left overnight. With long
sharp scissors cut the foil in the shape of the embossing to be illustrated, but
make it at least 1" larger all around. Next, hold the foil against the
embossing area, painted side up. Press firmly against the foil with your thumb
and fingers until you see impressions in the foil from the entire embossed area.
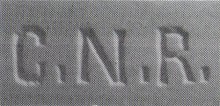
Check for areas that got missed, like the crossbars on the "E", and
the "A" crossbars, then release the foil from the glass.

Gently
stretch out the foil so that it is no longer curved, careful not to make any creases in it. Now take
a very fine black felt pen and carefully draw on the raised areas left in the
foil by embossing. Now it's off to the photocopier with the foil. There is a
little room for error, because the impressions in the foil will be near exact.
The only drawback I have found with this method is the unfamiliar way some
markings look when only the highest point of the actual embossing has been
illustrated. This is particularly noticeable with thick "prism" or
"chisel point" embossings.
Method #2
The shadow profile.
I like this method the best. The technique
requires the use of a good camera and critical lighting, so the trial-and-error
process can be an expensive one.
First you will need white plasticine or modeling clay. It is available at art
shops and some toy stores. I have found that FIMO clay does not work well. You
will have to loosen up the plasticine first by working it with your hands. Roll
the plasticine out into a slab of even thickness. Then roll the embossing
portion you want to copy across the plasticine slab. Be sure to use even
pressure as you roll or you will have a slight change in slab thickness. This
would be noticed during the photography stage.
If you want an actual size
reproduction of your embossing, you will have to size the region of the slab you
photograph according to the size of print you expect to have made from your
negative. I get 4 x 6 prints made, so I place a 6 inch ruler to one side of the
embossing on the slab, then I adjust the distance form my camera until the ruler
just fits in my view finder while in focus.
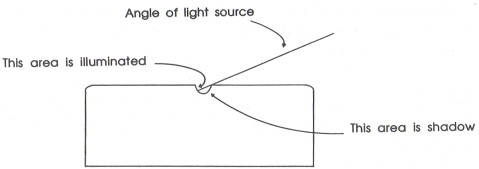
Magnified side view of the plasticine slab with embossing impression
The angle of lighting is very important in order to cast a shadow across the
impression left in the plasticine. The light source needs to be just slightly
higher than the plasticine. The trick is to illuminate the far edge of the
impression and cast a shadow off the edges nearest to the light source. I use
the top right corner as a point of source for the light. This illuminates all
the opposite areas: the bottoms and left sides of the impressions.
As you will
see, the impression left in the plasticine is now backwards. When you get your
film processed, you will have to remember to get these shots printed backwards.
This is an odd request, but I have had no problem getting the camera shops to
oblige.
| 
)
)
)